

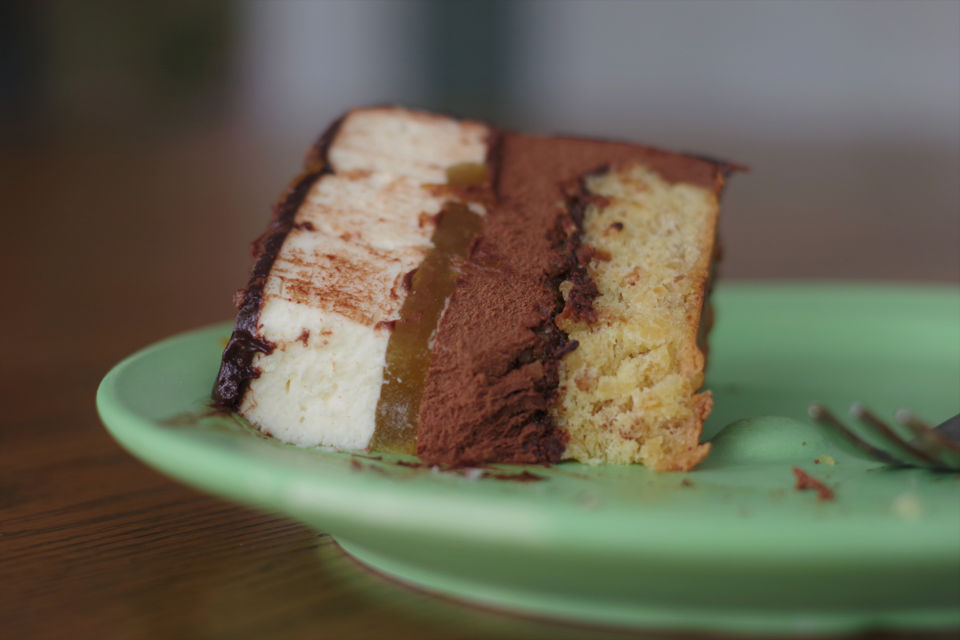
My wife prefers and loves creamy pastries and this cake was her wish for her birthday. The term “mousse” comes from the French word meaning “froth” or “foam”. As a general rule there are three components to the mousse: base, binder and aerator. In this cake the base is chocolate, the binder is a gelatin while whipped cream is used as aerator. Whipped cream can be substituted with egg whites but that brings to play the issue of raw egg consumption. Admittedly this is something I only became aware after moving to Canada. Where I come from the raw eggs were not unusual part of our diet and yet I never heard anyone getting unwell from it much less anything else. Even further my favorite dessert from my early childhood was raw egg yolks beaten with sugar. From what I recall I consumed enormous amounts of this lovely stuff.
This is fairly complex recipe and the cake ideally should be planned to be made over the course of two days. First day the biscuit and mousse layers and chocolate coating on the second day. The complexity is in the number of steps that have to be executed in the proper order, but in reality there are no real difficult nor tricky processes involved. Each step is self-explanatory and easily achievable.
You will notice fairly large quantity of vanilla extract in the recipe and that may leave you with the impression of error. Although I had the same doubts myself I tested it and can confirm that all the recipe prescribed quantities are correct.
The end result was wonderful and our birthday party was a big success! Everybody especially prized the cake and how tasty it was.
The recipe has been adapted from “like chocolate” food blog.
")
| Prep Time | 3 hrs |
| Cook Time | 40 min |
| Servings |
pieces
|
- 4 eggs separated
- 100 + 20 g granulated sugar divided
- 100 g hazelnuts roasted and ground
- 25 g unsalted butter melted
- 30 g all purpose non bleached flour
- 1 pinch fine sea salt
- 200 ml freshly squeezed orange juice
- 50 g granulated sugar
- 1 tbsp pure vanilla extract
- 1 tbsp unflavored powdered gelatin
- 2 tbsp filtered water
- 30 g roasted hazelnuts whole
- 50 g granulated sugar
- 1 tbsp filtered water
- 75 g milk chocolate
- 100 ml organic milk
- 200 g dark semisweet chocolate (min. 70% cocoa)
- organic orange zest 1 orange
- 250 ml whipping cream
- 1 1/2 tbsp unflavored powdered gelatin
- 2 tbsp filtered water
- 250 g mascarpone cheese
- 250 ml whipping cream
- 150 g powdered sugar
- 1 tbsp golden Rum
- 1 tbsp pure vanilla extract
- 1 tbsp unflavored powdered gelatin
- 2 tbsp filtered water
- 100 ml filtered water
- 200 g granulated sugar
- 60 g whipping cream
- 60 g unsweetened cocoa powder
- 40 g dark semisweet chocolate (min. 70% cocoa)
- 1 tbsp unflavored powdered gelatin
- 2 tbsp filtered water
- Line round container with plastic wrap film. To make the lining stronger and thicker, make two layers placed across each other. The container should be slightly smaller than your 9” spring form baking pan that will be used for the rest of the process. I used 7” round baking pan.
- In a small mixing bowl add 2 tbsp water and sprinkle 1 tbsp of gelatin powder evenly across the surface, set aside for 6-7 minutes.
- In a small saucepan over medium low heat (3 out of 10) stir together orange juice, sugar and vanilla extract. When the sugar is dissolved and solution warmed up stir in the gelatin. Once the gelatin is incorporated into the solution (do not simmer or boil!) pour it into a prepared plastic wrap lined pan.
- Let it cool first to room temperature and then in the fridge to allow gelatin to completely set. The gelatin has to be set before it can be used in the next step.
- Spread 130g hazelnuts over a baking pan and bake in the oven at 177°C (350°F) for about 25 minutes. Hazelnut skins will get very dark and cracked. Wrap the warm nuts in a kitchen towel and cool for 20 minutes. Rub the towel with nuts in a circling motion against the palm of your hand or a table top. This will remove almost all the skins and don't worry if some skin remains. This will add to the colour and flavor.
- Separate 30g of roasted hazelnuts and set aside.
- Fine grind the remaining 100g of hazelnuts. I normally use a zip lock bag and rolling pin to crush roasted hazelnuts to any size I like.
- Butter inside of 22 cm (9”) spring form pan. Line the bottom with parchment paper.
- Pre-warm the oven to 180°C (355°F), rack in the middle.
- In a small saucepan melt the butter and quickly whisk in egg yolks. Be careful the butter should be just barely melted and not too hot!
- In a medium size mixing bowl stir together 100g ground hazelnuts, 20g sugar and 2 tbsp flour. At this point you want to make sure that there are no any clumps in the mixture.
- In another mixing bowl beat egg whites with a pinch of salt and 100g of sugar.
- Use large mixing bowl to mix together egg yolk mixture with ¼ of beaten egg whites. Once it is unified fold in the rest of the egg whites, do not overmix.
")
- Fold in ground hazelnut mixture by using a scooping motion from the outside towards the middle of the bowl.
")
- Pour the batter into prepared spring form pan. Spread the batter evenly and flat on the top.
- Bake in pre warmed oven for 20-30 minutes until biscuit starts separating from the form and when toothpick comes out clean when inserted in the middle of the biscuit.
- Cool off for 5 minutes on a cooling rack before removing the form side. Use another flat pan to invert the biscuit, peel off the parchment paper and reinvert it back to the cooling rack. Let it cool completely.
- In a small mixing bowl add 2 tbsp water and sprinkle 1 tbsp of gelatin powder evenly across the surface, set aside for 6-7 minutes.
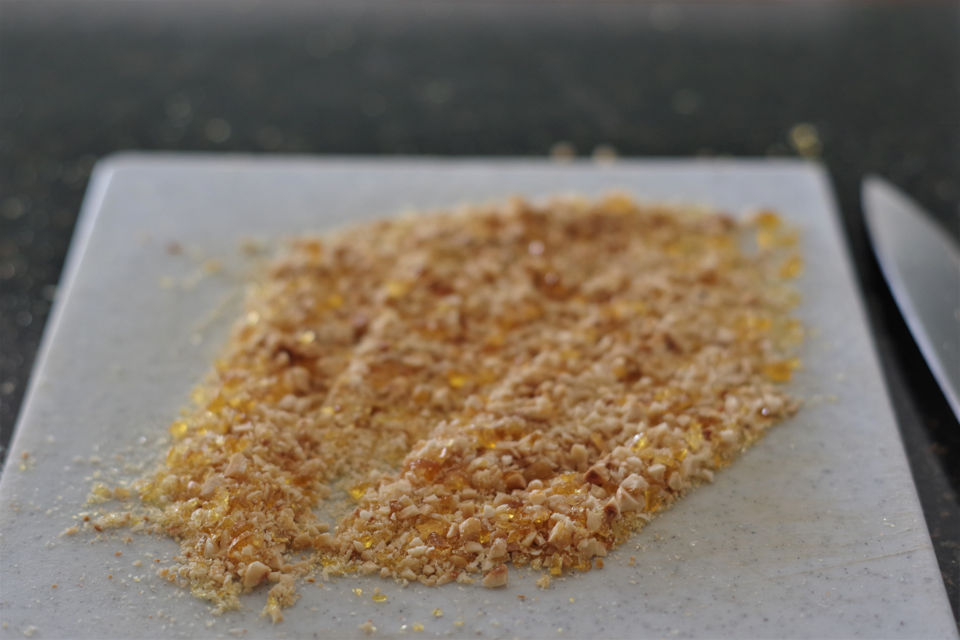
- In a small saucepan add sugar and water and heat up without stirring over low heat (3 out of 10). Watch it carefully and once the color turns to light caramel brown remove from heat, stir in 30g of whole roasted hazelnuts. Quickly pour off caramelized mixture over parchment paper, let cool off completely.
")
- Use sharp knife and cutting board to coarsely chop caramelized hazelnuts, set aside.
")
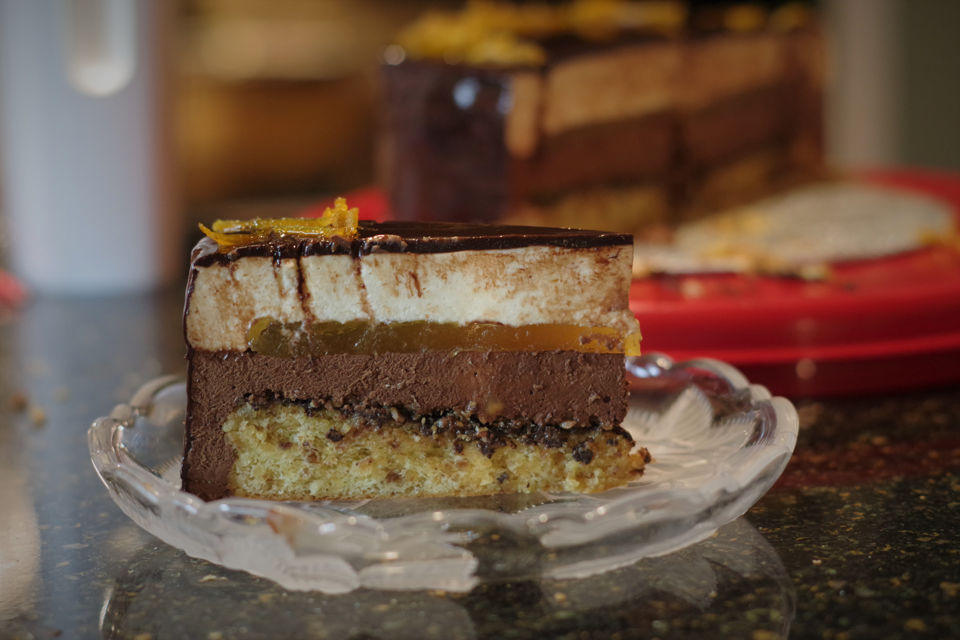
- Butter the side of 22 cm (9”) spring form and line it with the parchment paper. The butter will act as a glue that will hold the paper. Place 8” cardboard disc on the bottom of the form.
- Place the biscuit on top of the cardboard disc, make sure it is centered in the spring form.
")
- In a double boiler melt the chocolate and spread it evenly over the biscuit. Sprinkle chopped caramelized walnuts over the chocolate.
")
- In a small mixing bowl add 2 tbsp water and sprinkle 1.5 tbsp of gelatin powder evenly across the surface, set aside for 6-7 minutes.
- Using electrical mixer beat the whipping cream until stiff peaks are formed.
- In a small sauce pan and over low heat (2 out of 10) heat up chocolate and milk. Once the chocolate is melted add the gelatin and mix until dissolved, about 2 minutes. Add the orange zest to the mixture. Let the chocolate mixture cool off to about 25°C (77°F).
- Using a whisk incorporate lukewarm chocolate into whipping cream. If chocolate is not cooled off and is too hot it will melt the whipping cream!
")
- Pour off the mixture over the biscuit and its sides, making sure chocolate mousse fills all the pockets around the form and is level. Put it in the fridge, let cool and set completely, about 1-2 hours.
")
- Once the chocolate mousse is set and firm take the orange gelatin layer and center it on the top. Put it back in the fridge.
")
- In a small mixing bowl add 2 tbsp water and sprinkle 1 tbsp of gelatin powder evenly across the surface, set aside for 6-7 minutes.
- In a large mixing bowl beat the whipping cream until stiff peaks are formed.
- In a medium size mixing bowl mix together mascarpone cheese and sugar until uniform.
- In a small saucepan and over low heat (2 out of 10) heat rum and vanilla extract. As it warms up add to it gelatin and mix until it dissolves, about 2 minutes.
- Using electrical mixer incorporate first the gelatinous mixture into the mascarpone mixture and then fold it all together into the whipping cream.
- Pour it on top of the chocolate mousse layer making sure that there are no air pockets left and that is spread evenly around the form with top surface made smooth and flat. Put it in the fridge and let it set and completely cool off, best if left overnight.

- In a small mixing bowl add 2 tbsp water and sprinkle 1 tbsp of gelatin powder evenly across the surface, set aside for 6-7 minutes.
- In a small saucepan over low heat (2 out of 10) heat up together: chocolate, whipping cream, water, sugar, cocoa powder. Once all is melted and unified mix in the gelatin and let is fully dissolve, about 2 minutes. Pass the mixture through fine mesh strainer to remove any remained solids.
- Let the glaze cool off to about 26°C (79°F) and mix occasionally to prevent skin forming on a surface. This is critical because if the glaze is too hot it will melt the mousse and if it is too cold it will not spread and coat the cake properly.

- Remove the ring from spring form and peel off the parchment paper from the cake.
")
- Place the cooling rack over the shallow baking pan.
- Using 2 long offset knifes and making sure you get under the cardboard disc, transfer the cake to the cooling rack.
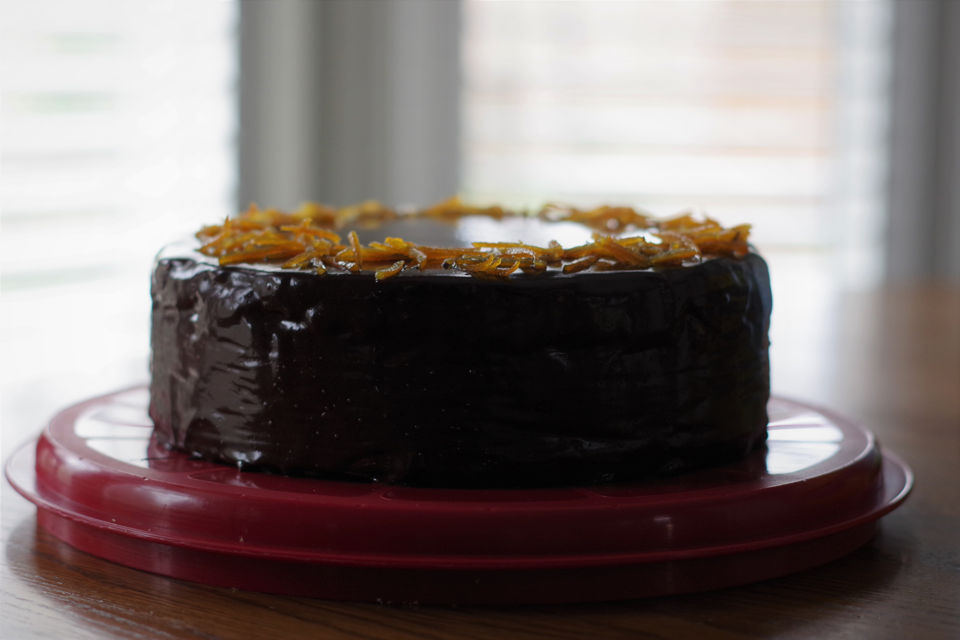
- Slowly pour glaze on top of the cake, let it overflow and coat the cake sides. Use long offset cake knife to push any excess chocolate from the top to the uncoated side pockets.
")
- Decorate the top with candied orange strips.
")
- Place the cake in an enclosed container and refrigerate 24hrs before serving.
- Use sharp, warm and wet knife to cut the cake.
")

No Comments