
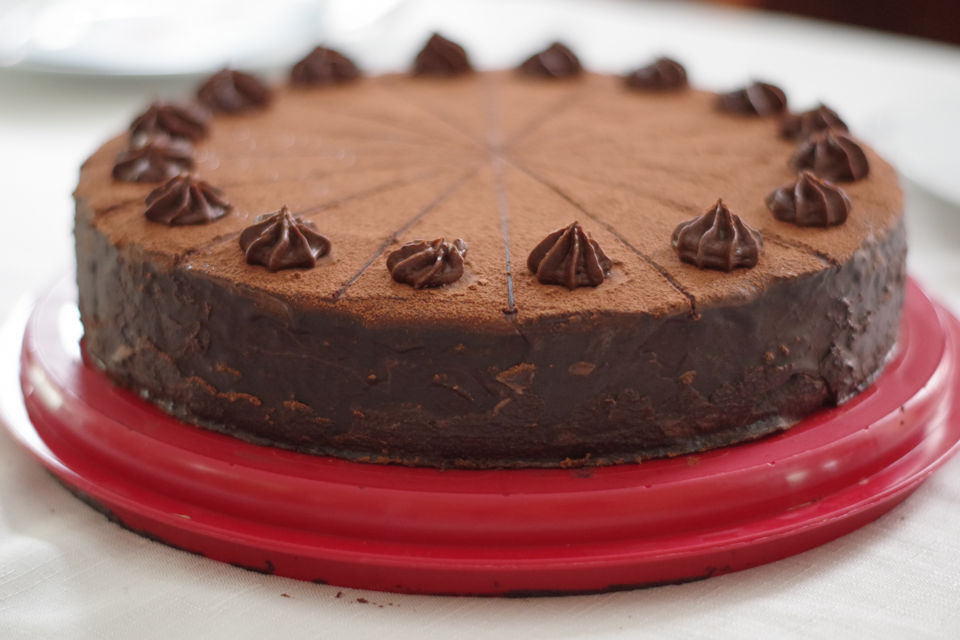
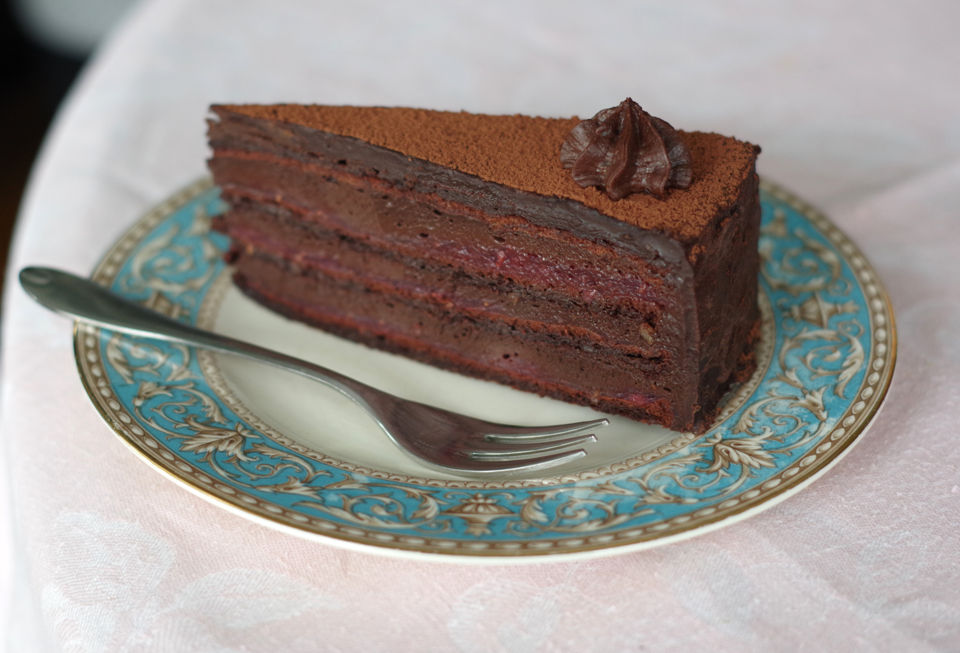
I asked my family: 1 to 10 what mark would you give to this torte? The answer was unanimous: 11!
This winner is the torte I baked for my birthday this year. I wanted something new that I haven’t made before, but at the same time something quite special and then why not even exceptional! It was obviously rather tough criteria to meet, but at the end this was it: Baron Torte.
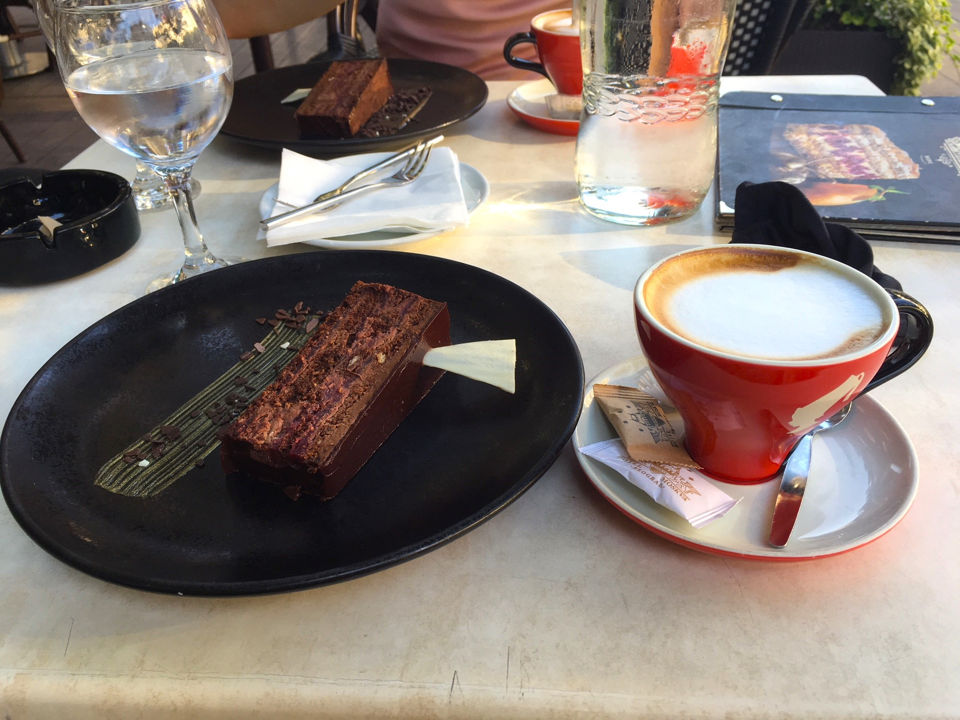
I have heard of this torte before, but for one reason or the other it managed to elude me. This year during our summer trip to Serbia the torte appeared on our lunch menu and we seized on the opportunity to taste it. That was at the landmark Café of famous Belgrade’s hotel Moscow. Among many tasty confectionery pieces of art that came out of this place none is as widely recognized and liked as what is known as Moscow Schnit. This iconic cake was a close contender for this year birthday cake, but instead of choosing summery light and fruity flavor I opted for a chocolate richness!
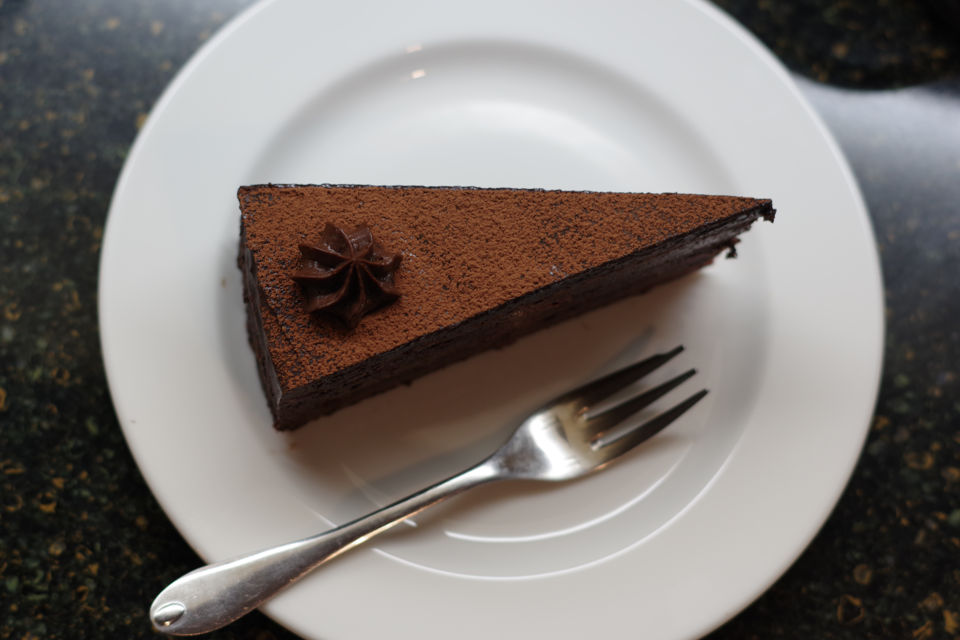
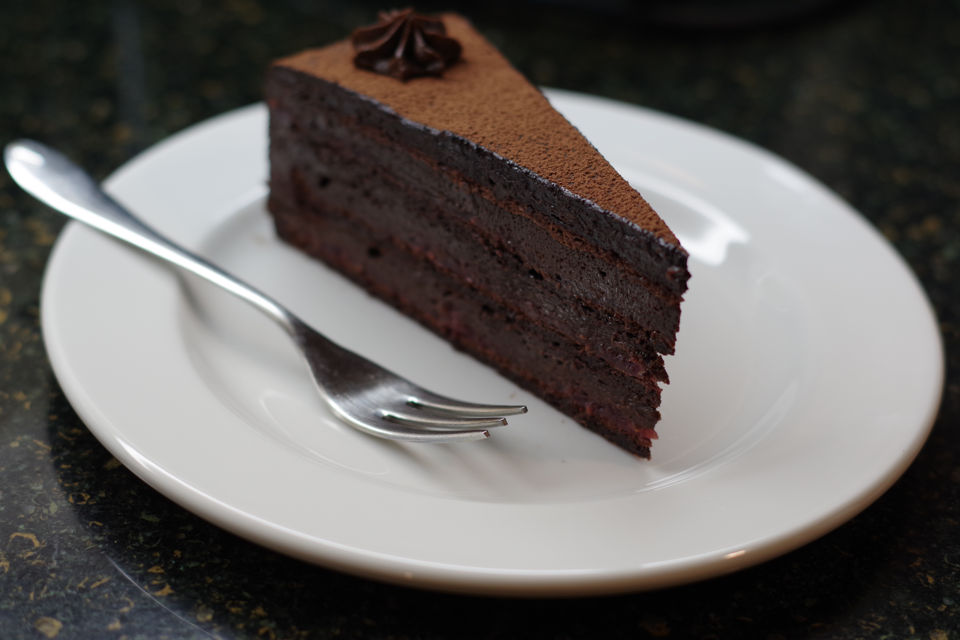
Baron Torte is clearly the cake aimed at the chocolate lovers and admittedly I am one of them! The cake’s name “Baron” alludes to its noble and refined look and taste. Its rich and silky chocolate filling is complimented with its perfect pair: raspberry filling. It is a memorable experience truly enjoyed one spoon at the time!
Since this was a jubilee birthday year we expanded the celebrations to two rounds of party for family and friends. Baron Torte was served on one event and my other favorite Vasa’s Torte on the other. This time I made Vasa’s torte looking more rustic and it was large, about 4 kg and serving 20-24.
On a process side Baron Torte is definitely not a cake that one can just rush through and slap together in couple of hours. It is fairly delicate preparation process and therefore requires some patience and dedication. As the saying goes: it is not for the faint-hearted! It will take about day and half to make, but the result will be definitely worth it! The process in itself is not that complicated, but there are many steps with some finesse in executing and proper timing. I tried to lay out the baking instructions that are logistically sequenced in the most efficient fashion.
The recipe has been adapted from Maja Babic whose food blog “Provereni Recepti” I have been following for a long time. The ingredients are exactly the same with my own slight adjustments in the process steps and their execution, relying on my own baking knowledge and experience.

| Prep Time | 30 minutes |
| Cook Time | 2.5 hours |
| Servings |
pieces
|
- 12 egg whites divided 4x3 egg whites
- 300 g granulated sugar divided 4x75g
- 60 g unsweetened cocoa powder divided 4x15g
- 60 g ground almonds divided 4x15g
- 12 egg yolks
- 250 g granulated sugar
- 50 g unsweetened cocoa powder
- 40 g chocolate pudding powder Dr. Oetker
- 400 g organic milk
- 200 g dark semisweet chocolate (min. 70% cocoa) broken in small pieces
- 180 g unsalted butter tempered to rom temperature and cut to 0.5" cubes
- 400 g raspberries frozen
- 130 g granulated sugar
- 40 g raspberry pudding powder or substitute with a vanilla pudding powder
- 5 g unflavored powdered gelatin
- 300 g filtered water divided
Ingredients
Sponge cake (4 layers)
Chocolate Buttercream
Raspberry Filling
Chocolate Glaze
Decoration
|
|
- In a medium size saucepan add 12 egg yolks, 250g sugar, 50g sifted cocoa powder, 40g chocolate powder pudding. Add about 100g of milk and whisk until everything is unified and smooth, whisk in the remaining 300 ml of milk.

- Cook over medium heat (5 out of 10) whisking constantly until the mixture starts to thicken up, the temperature reaching 80ºC (176ºF). Reduce heat to medium low (3 out of 10) and cook for another 2-3 minutes, keep whisking constantly. Take it off the heat.
- Add 200g of chocolate and 180g of butter to the hot mixture. After everything is melted whisk until fully incorporated.
- Cool it in a water bath and bring the mixture to room temperature. You have to stir frequently to avoid forming the crust on a surface and to speed up cooling process.
- Tightly press the stretch wrap film on top of the buttercream, sealing it up and refrigerate for a minimum of 2 hours.

- Preheat the oven at 180 ºC (355 ºF), rack in the middle.
- Butter 28 cm (~10.5 ") spring form cake pan and line the bottom with parchment paper.
- Prepare 3 separate small bowls with dry ingredients: 75g sugar, 15g cocoa, 15g ground almonds.

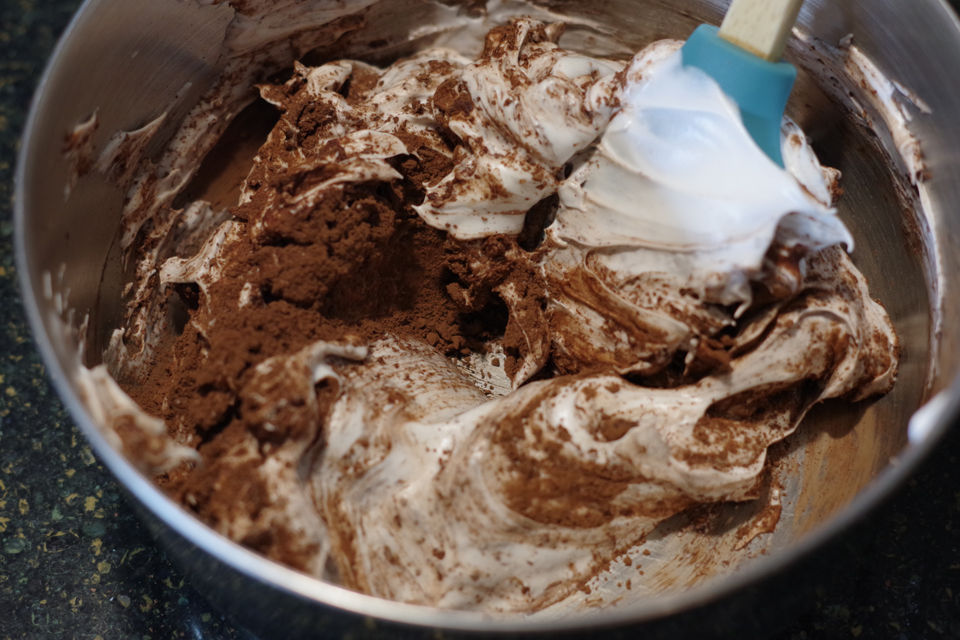
- In a medium size mixing bowl beat 3 egg whites on a medium speed until they form soft peaks. At high speed gradually beat in 75g of sugar until the whites are stiff and shiny.

- Sift in 15g of cocoa powder and add 15 g of ground almonds. Gently fold it in by using a silicone spatula.

- Pour the batter to the spring form pan, level off and smoothen the top.

- Bake for 20-30minutes or until the sponge cake springs back when lightly pressed in the middle.
- Transfer to the cooling rack, unmold after 5 minutes. Use a sharp knife to separate the cake layer from the mold's side. Let cool completely, do not remove parchment paper.
- Repeat the same process with 3 more cake layers.

- In a medium size saucepan add 400g frozen raspberries, 130g sugar and 165g water. Bring to boil over medium heat (5 out of 10), stir occasionally, Cook for 2-3 more minutes and then take it off the heat.

- Prepare two small mixing bowls. In one whisk together 40g raspberry (or vanilla) pudding powder and 100g water. In the second bowl sprinkle 5g of unflavored gelatin powder over 35g of cold water. Let it stand about 5 minutes until gelatin absorbs the water.
- Add pudding to the raspberry mixture and cook over medium heat (5 out of 10) for 2-3 minutes, until it starts thickening up. Add hydrated gelatin, stir constantly until gelatin dissolves, about 2 minutes. Do not let it become too hot and simmer!
- Let the filling cool to about 30ºC (86ºF). The filling has to be warm enough so can easily spread, but not to melt butter chocolate cream that will be layered over! The easiest way to accomplish this is to cool it off in a water bath and stirring occasionally.

- Using 7.5 cm (3") wide parchment paper strip line up the side of 28 cm (~10.5 ") spring form cake pan.
- Using a hand held mixer at medium speed mix the chocolate buttercream for few minutes until light and fluffy.

- Divide, cover and refrigerate 150g of chocolate buttercream that will be later used for the cake side layer and decoration. The reminder of chocolate buttercream divide into 3 equal parts that will be used for the cake filling layers (approximately 350g each layer).
- Divide the raspberry filling into 3 equal parts, approximately 260g per layer.

- Center and lay the first cake layer on the bottom of the spring form, paper down (the parchment paper will remain attached to the cake layer).
- Use a silicone spatula to evenly spread out the chocolate buttercream layer, smoothen the top.

- Top it up with raspberry filling layer. Best approach to the application is to spread small patches of raspberry filling across the surface and then with silicone spatula carefully smoothen and spread these patches until making a continuous and thin layer on top of the chocolate buttercream layer.

- Center and lay the second cake layer, paper on the top. Carefully peel off the parchment paper.
- Repeat the process of first adding the layer of chocolate buttercream followed with the raspberry filling layer.
- Center and lay the third cake layer, paper on the top. Carefully peel off the parchment paper.
- Repeat the process of first adding the layer of chocolate buttercream followed with the raspberry filling layer.
- Center and lay the fourth cake layer, paper on the top. Do not peel off the paper, cover the cake tightly and refrigerate overnight.
- Remove the ring of the spring form pan and peel off the parchment paper strip from the side and the top of the cake.
- Using a large cutting board or flat plate turn the cake upside down, remove the bottom of spring form pan and peel off the parchment paper.
- Cover the bottom of the cake with 4 large pieces of parchment paper and invert the cake on a serving plate. Note: These parchment papers are temporary protection for the serving dish from buttercream coating and chocolate glaze after which the papers will be removed.

- Use approximately 100g of saved chocolate butter cream to thinly coat the top and sides of the cake. The purpose of this application is filling any crevices and voids before application of the chocolate glaze. Cover the cake and refrigerate.

- Over double boiler melt the chocolate, stir in the butter until smooth and uniform. Let the chocolate glaze cool to about 40ºC (104ºF) before application.
- Pour the chocolate glaze in a slow and sweeping round motion by creating a wide ring that will coat most of the cake top and some will spill over the side edges. Most of the chocolate will be on top of the cake.
- Use an offset metal spatula to coat and level off the glaze on the top in one pass, sliding the spatula across the cake. Some of the chocolate will spill over and bleed down the cake sides. Use metal spatula to recover the spilled chocolate and glaze the cake sides until fully covered. You have to work fast before the chocolate hardens up!
- Put the cake aside for an hour until the chocolate glaze is set.
- Carefully remove parchment papers from the bottom and clean up the plate from any remaining spills.
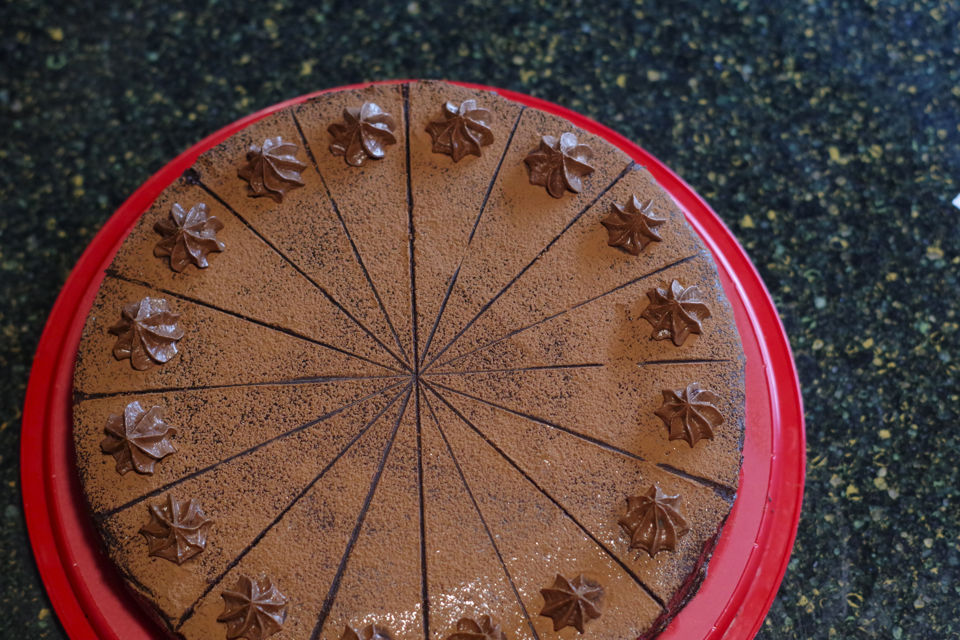
- Sift cocoa powder across the top of the cake.
- Using a wire cake cutter carefully imprint thin grooves in the cake top, marking up 16 equal sections.
- Use a tip of wetted finger to remove cocoa powder at the back in each of 16 sections. This is to allow for a proper bond between a buttercream and rosette decoration that follows.

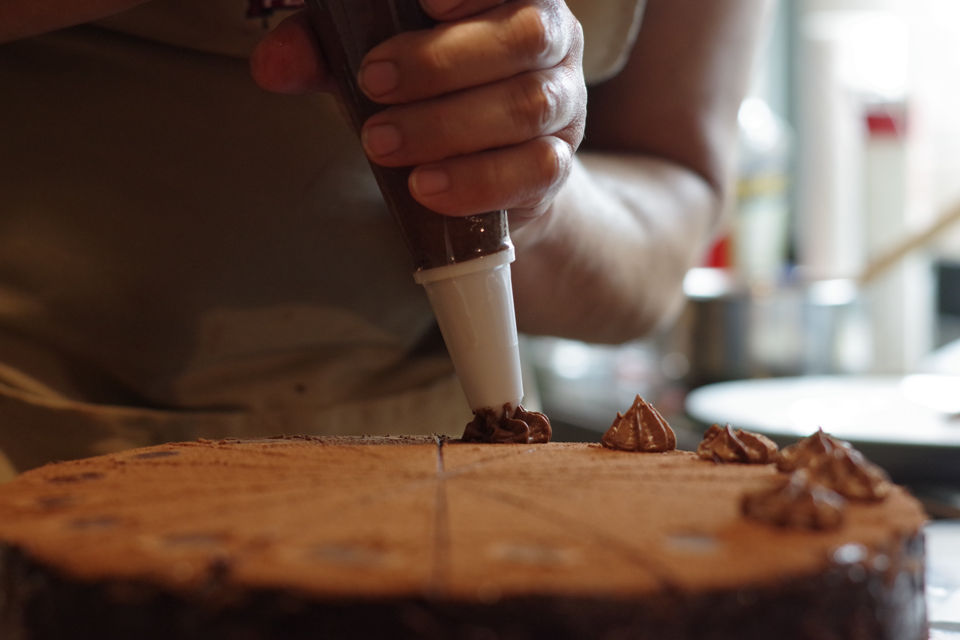
- Use remaining chocolate buttercream and pastry bag fitted with 9/16" star tip and pipe 16 large rosettes around the cake perimeter.

- Cover the cake and refrigerate.
- To cut the cake use warmed up knife and wipe it off with paper towel after each cut. The knife can be warmed up by being placed in a container filled with hot water.

No Comments